This Spatchcock Turkey with Dry Brine recipe offers a reliable, foolproof method to achieve the crispiest, juiciest turkey in the least amount of time. Read on to learn all the tips and tricks to pull it off with ease.

A Turkey That Actually Tastes Good
This post is meant to convince you of the many reasons to spatchcock a turkey. It’s so very worth it for its simple ease of preparation, time-savings, and most importantly, delicious flavor.
It will not take you longer than 15 minutes to spatchcock and dry brine a turkey and I guarantee your mind will be blown with how easy and delicious it is. Here, you will find all your questions answered with step-by-step photos to guide you start to finish.
If you are in charge of making the turkey this year, you must try this superior method for cooking your bird. Once you try it, you will never cook turkey any other way.
What Is A Spatchcock Turkey?
I have a few other recipes on this site where I extol the advantages and virtues of spatchcocking a whole chicken. The same exact principles and techniques apply to a whole turkey.
The spatchcock technique involves cutting out the backbone of a whole turkey, or chicken to butterfly it. With the backbone removed, the bird will lay flat to cook. By laying flat, the thighs and drumsticks will now finish cooking at the same time as the breasts. In other words, no more dry breasts, and no more undercooked legs. YAY!
The best part? Spatchcocking a turkey is a simpler, quicker method to achieve a perfectly cooked, juicy, and succulent turkey. When I say quicker, I’m talking you can roast a whole turkey in only 90 minutes!
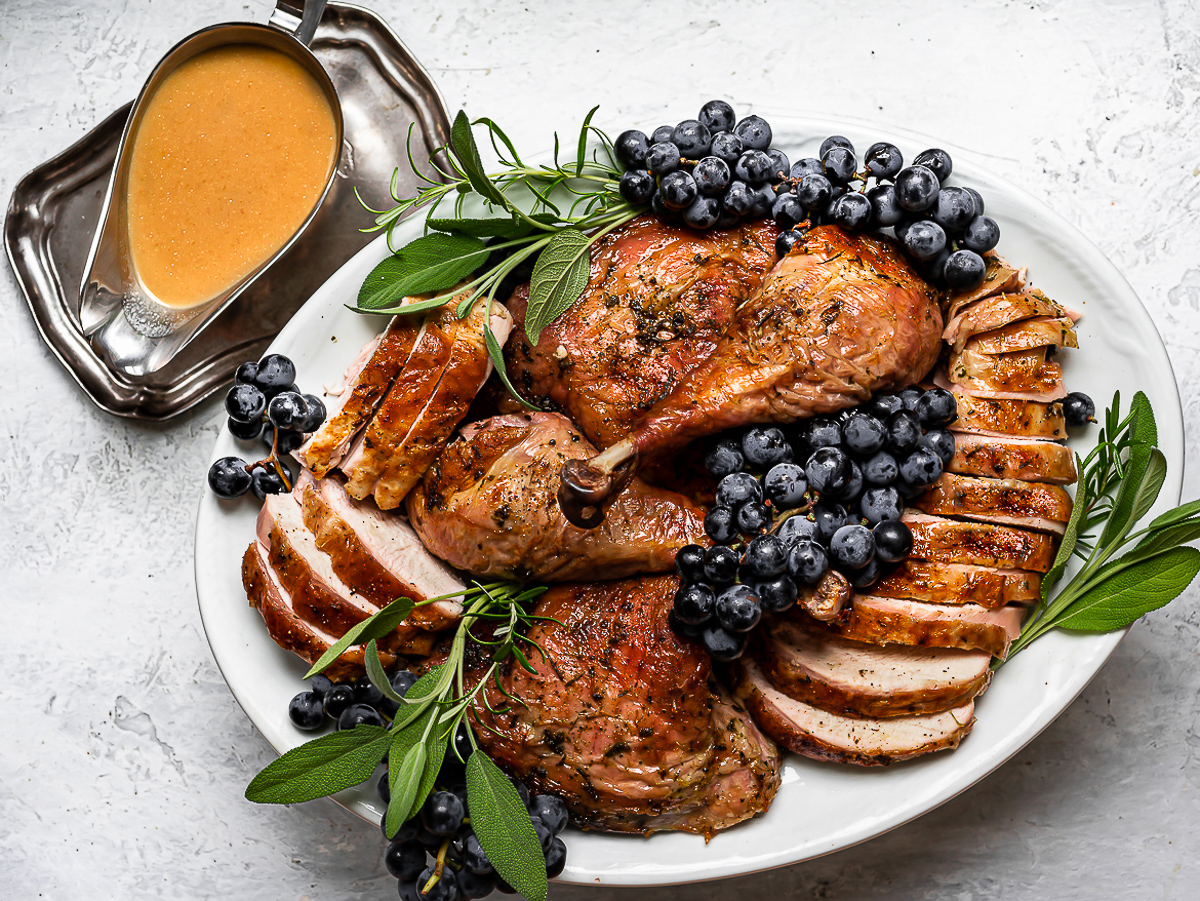
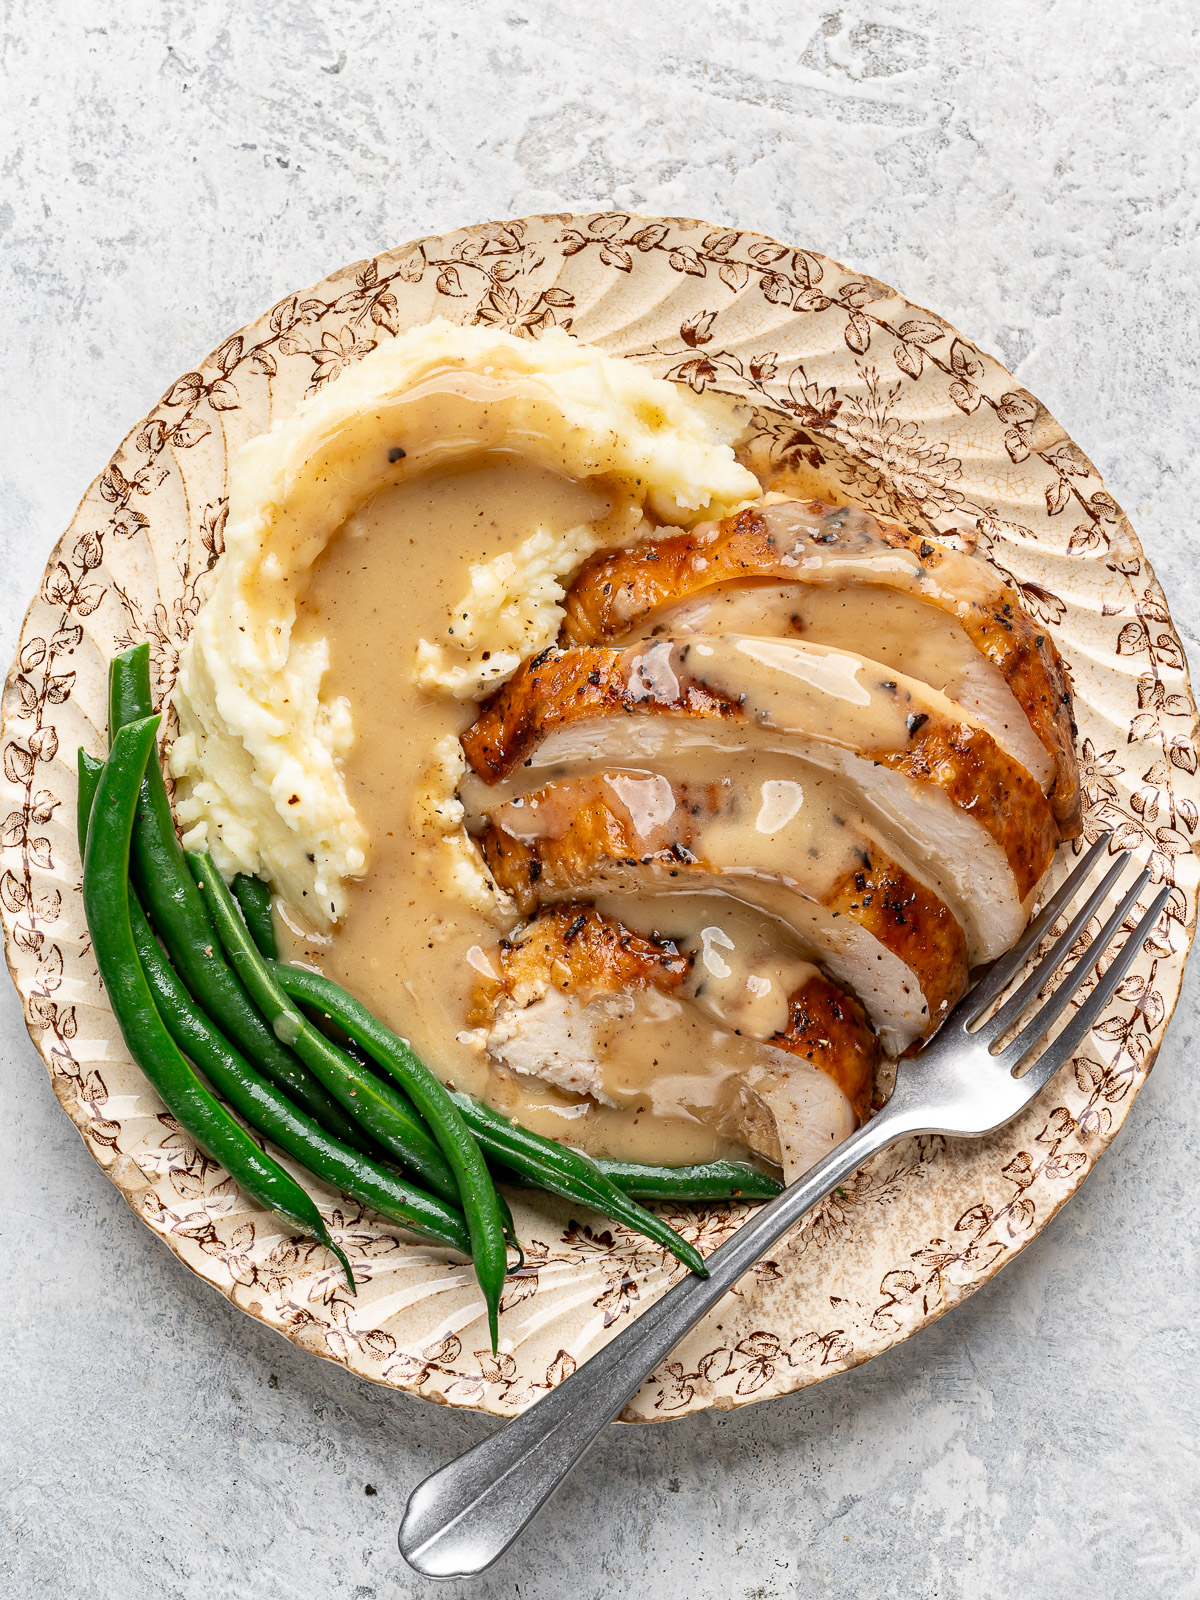
Perhaps the only drawback to a spatchcocked turkey is that it will not look as lovely as a whole roasted turkey on your holiday table. But have you ever really brought a whole, un-carved turkey to the table? Me either. Plus, take a look at the photo above of the finished presentation. It looks glorious, right? Better yet, it’s the most succulent turkey you’ll ever have.
Why Spatchcock A Turkey?
Not only is preparing and cooking a spatchcocked turkey easier than a whole turkey, it will also cook faster, cook more evenly and taste better.
If you still aren’t convinced, here all the advantages outlined:
- EVEN COOKING: When the turkey is flattened, the legs and breast become an even surface. This allows the legs – which take the longest to cook – to be done at the same time as the breast.
- HIGHER HEAT: Because of the even cooking explained above, you no longer risk drying out the breast before the thighs are done. This allows you to roast the turkey at a higher temperature without burning, or drying out the breast. A spatchcocked turkey is cooked between 400ºF and 450ºF and is done in approximately 90 minutes. Genius!
- CRISPIER SKIN: All the skin is now exposed in one even layer which means it will crisp up evenly in the hot oven.
- JUICY DARK MEAT AND JUICY WHITE MEAT: Again, a flat turkey will cook evenly allowing both the dark and white meat to remain juicy and moist.
- TAKES UP LESS SPACE IN THE OVEN: No need to remove racks to make space for a flattened turkey. This allows you to cook two turkeys at the same time, if needed.
- THE BACKBONE MAKES A WONDERFUL STOCK: If you spatchcock the turkey you will have the turkey backbone to make an easy wonderful stock along with the giblets which makes a delicious gravy. If you order a spatchcocked turkey from a butcher, be sure to ask them to include the removed backbone with the turkey.
Recipe Ingredient Notes
This spatchcock turkey recipe includes an herby dry brine and a butter rub for roasting the turkey. The herbs are optional but they infuse the turkey with a lovely aroma and wonderful flavor.
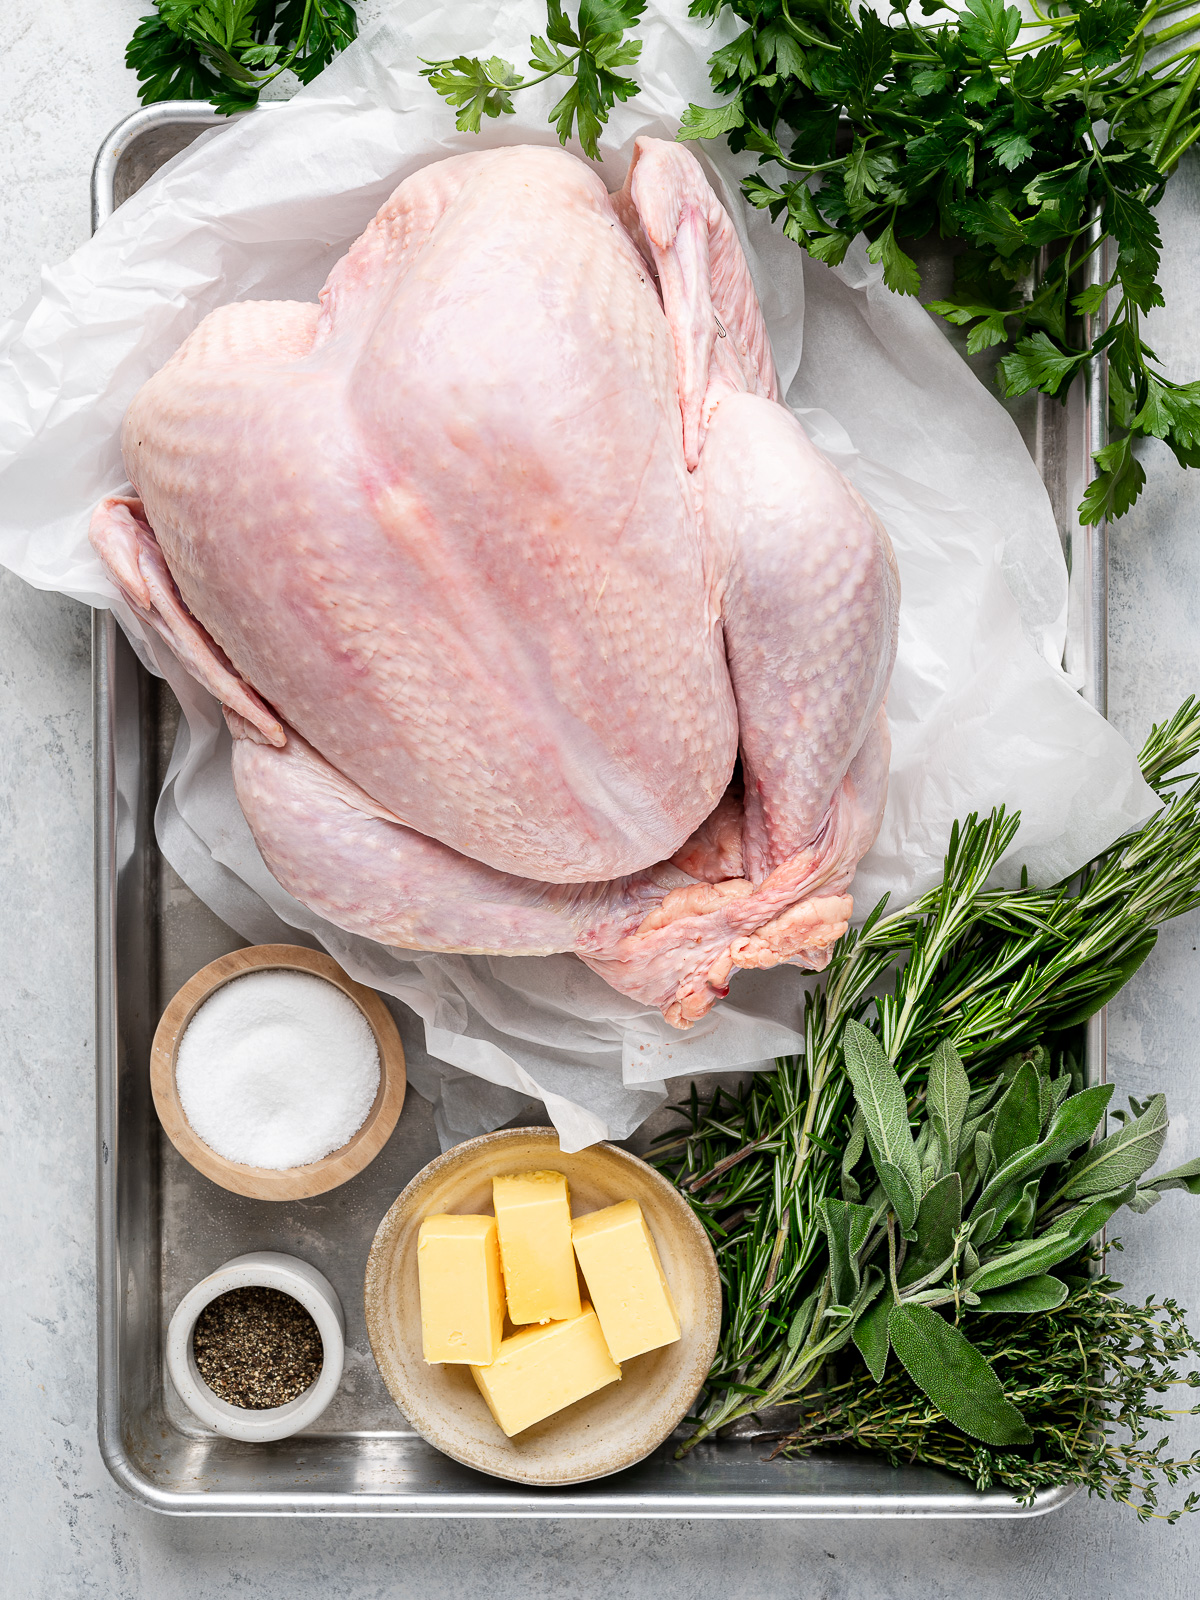
- Turkey: If possible, buy a turkey from a butcher or a market that sells natural turkeys. It is important to note that dry brining is not for self-basting or pre-seasoned turkeys. (See section below for what size turkey I recommend.)
- Dry brine: Salt is all you need to dry brine your turkey. However, to infuse the turkey with even more flavor, I like to also add chopped herbs such rosemary, sage, and thyme. Marjoram would also be lovely. Scroll down for more information on the salt you should use.
- Butter: Melted butter is rubbed all over the turkey to ensure it is super juicy and tastes even more glorious. You can use olive oil, if you prefer.
- Optional – vegetables for roasting under the turkey – Though not essential, if making gravy from the pan drippings, it’s nice to add some aromatics to the baking sheet. I added chopped onion, carrots, and celery.
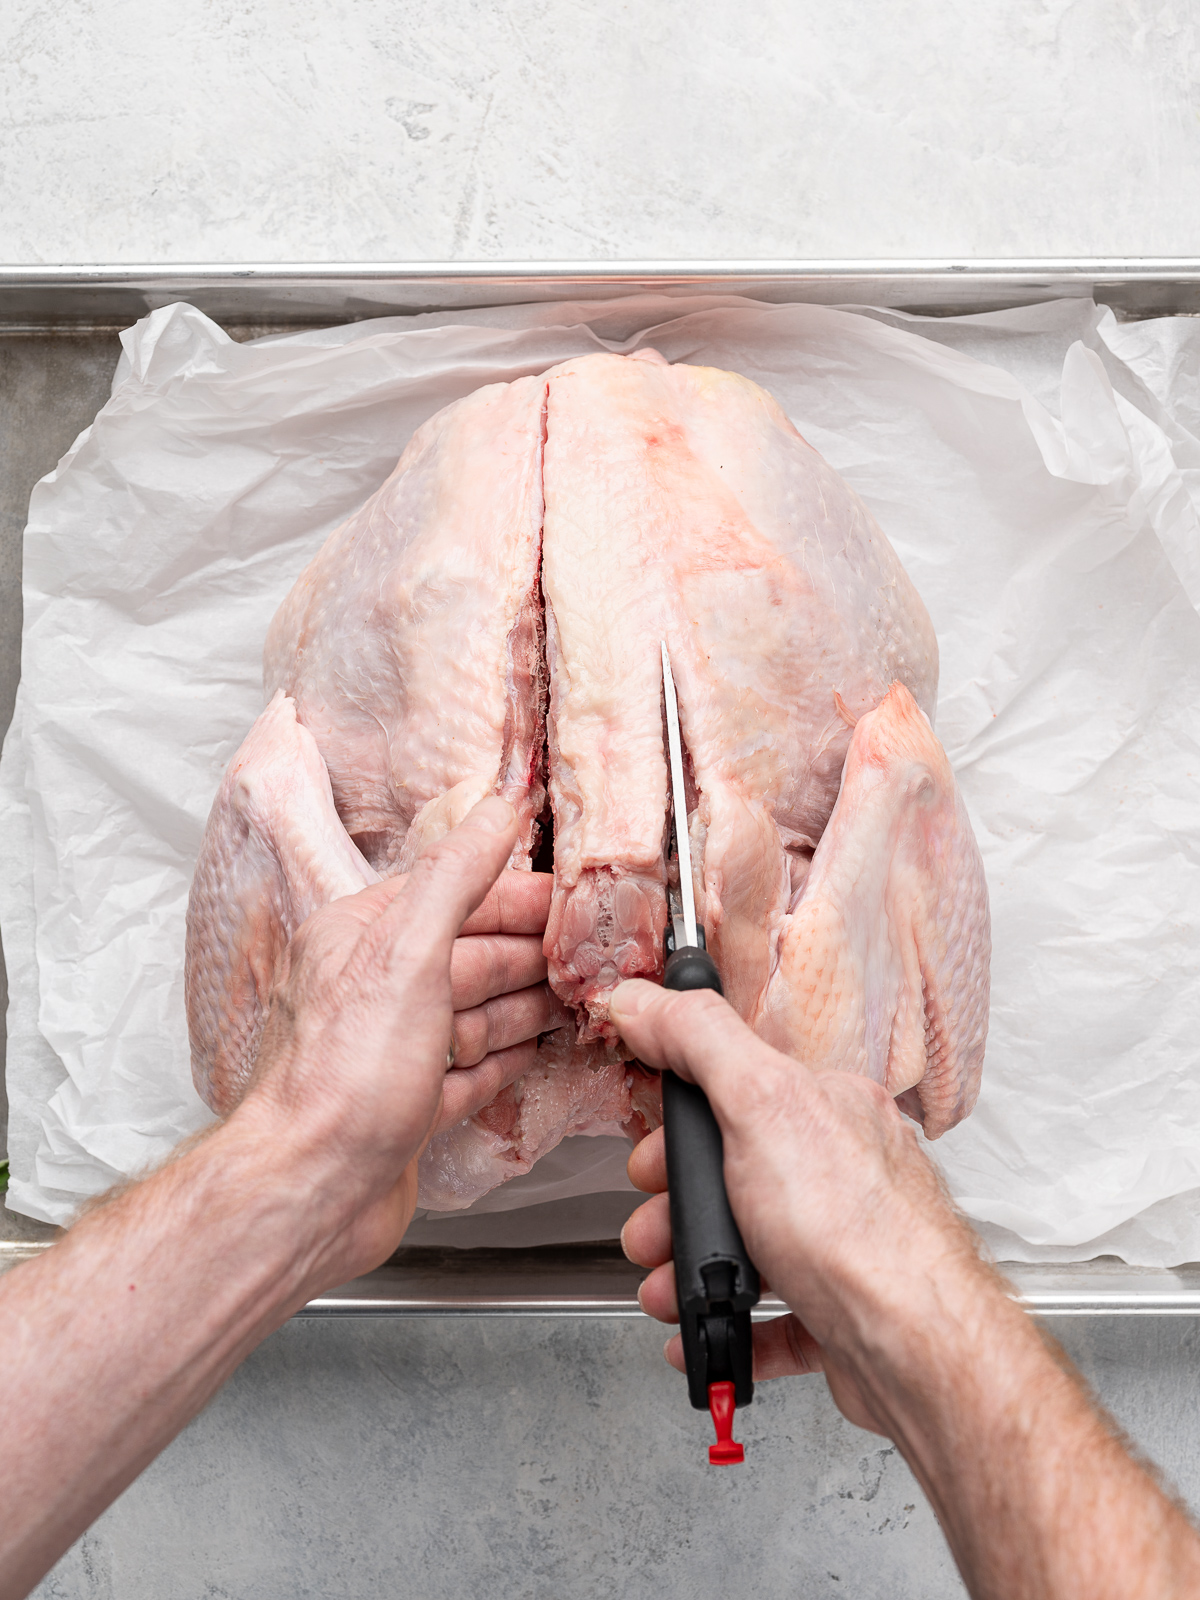
How To Spatchcock A Turkey
If you have access to a great butcher, they should be happy to spatchcock the turkey for you. Otherwise, spatchcocking a turkey is much easier than it sounds and the bit of initial effort will reward you plenty in the end.
Before we start spatchcocking a turkey, here’s a few tips that will make the job easier:
- Poultry shears, or very sharp kitchen scissors, are going to make spatchcocking the turkey a breeze. I have, and love, these ones.
- As you’re cutting through the bone, you may find your scissors getting stuck. If this happens, try cutting even closer, or further, to the sides of backbone until you can cut through.
- It is best to start cutting from the tail end of the bird but if you are struggling, spin the bird around and cut from the neck end.
Here’s the step-by-step to spatchcock a turkey:
Remove turkey from its packaging, then remove neck and giblets from the body cavity, reserving for stock and gravy, if desired.
To remove the backbone, place the turkey, breast-side down on a large cutting board or on a sheet pan. Using a pair of poultry shears or sharp kitchen shears, cut down each side of the backbone, cutting all the way through. Remove the backbone completely and set aside for making stock, if you wish.
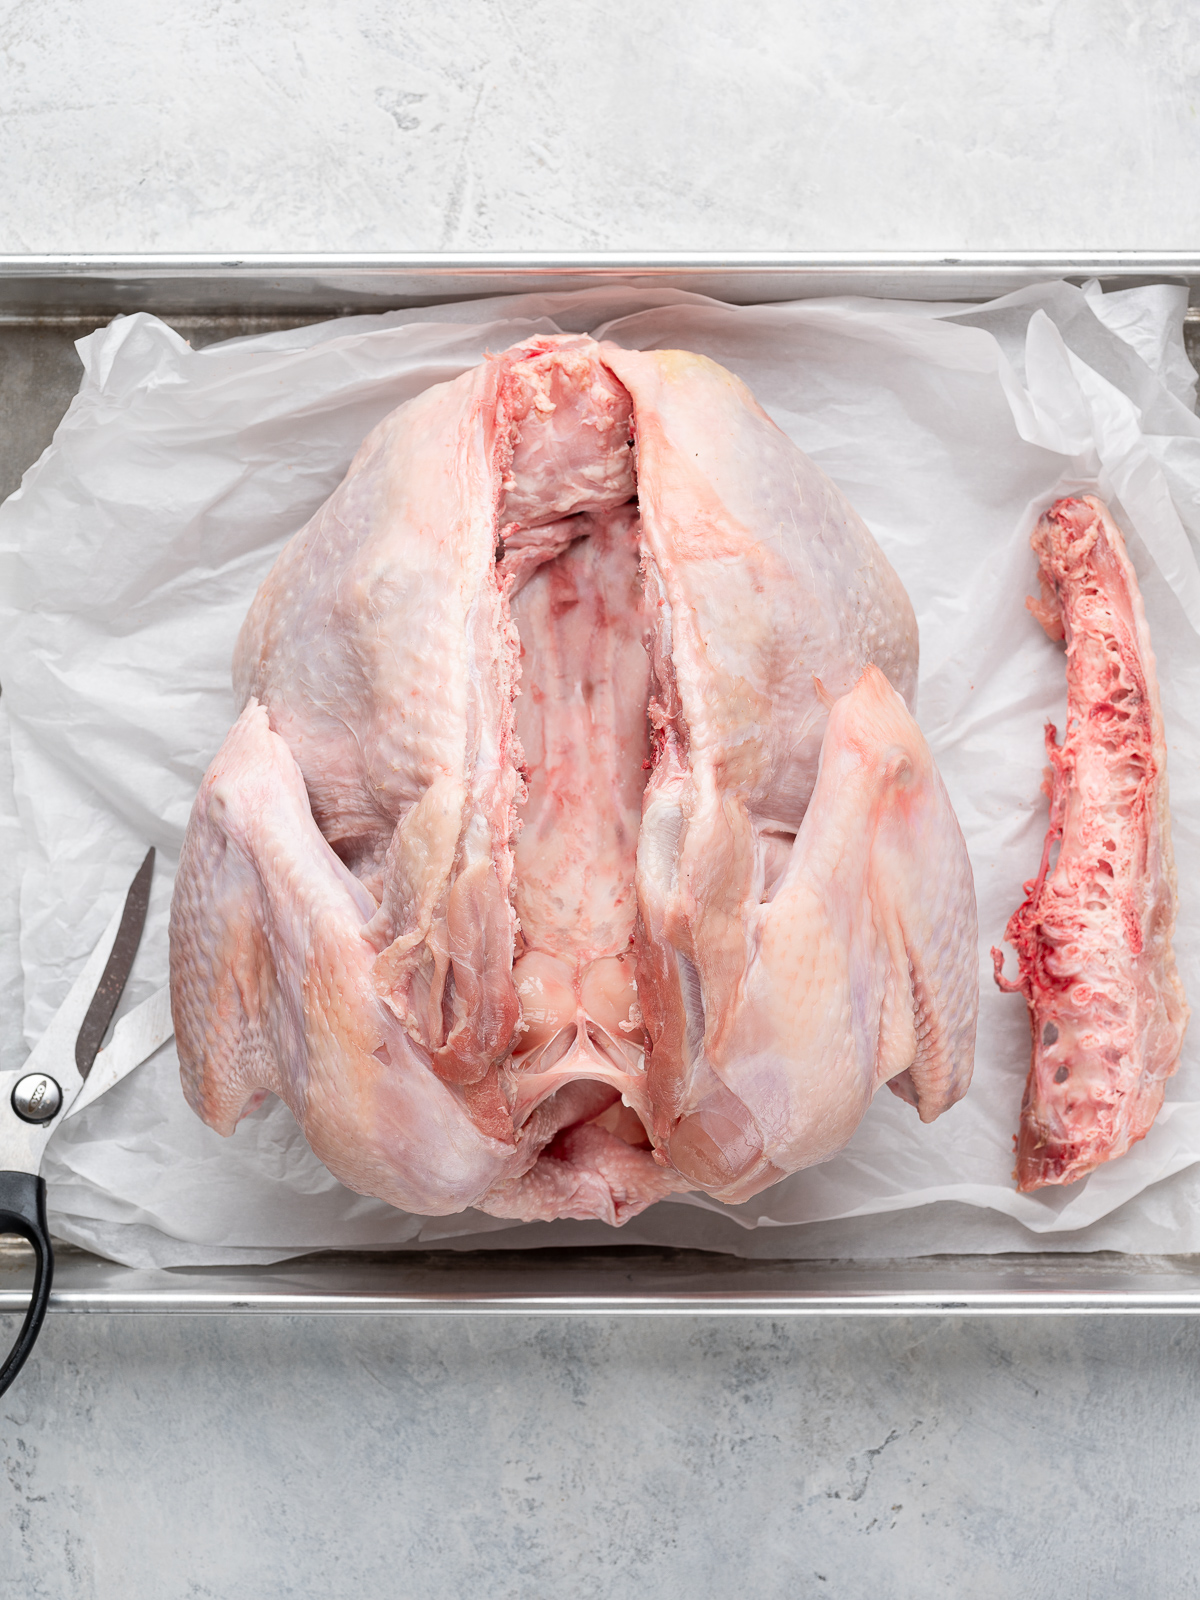
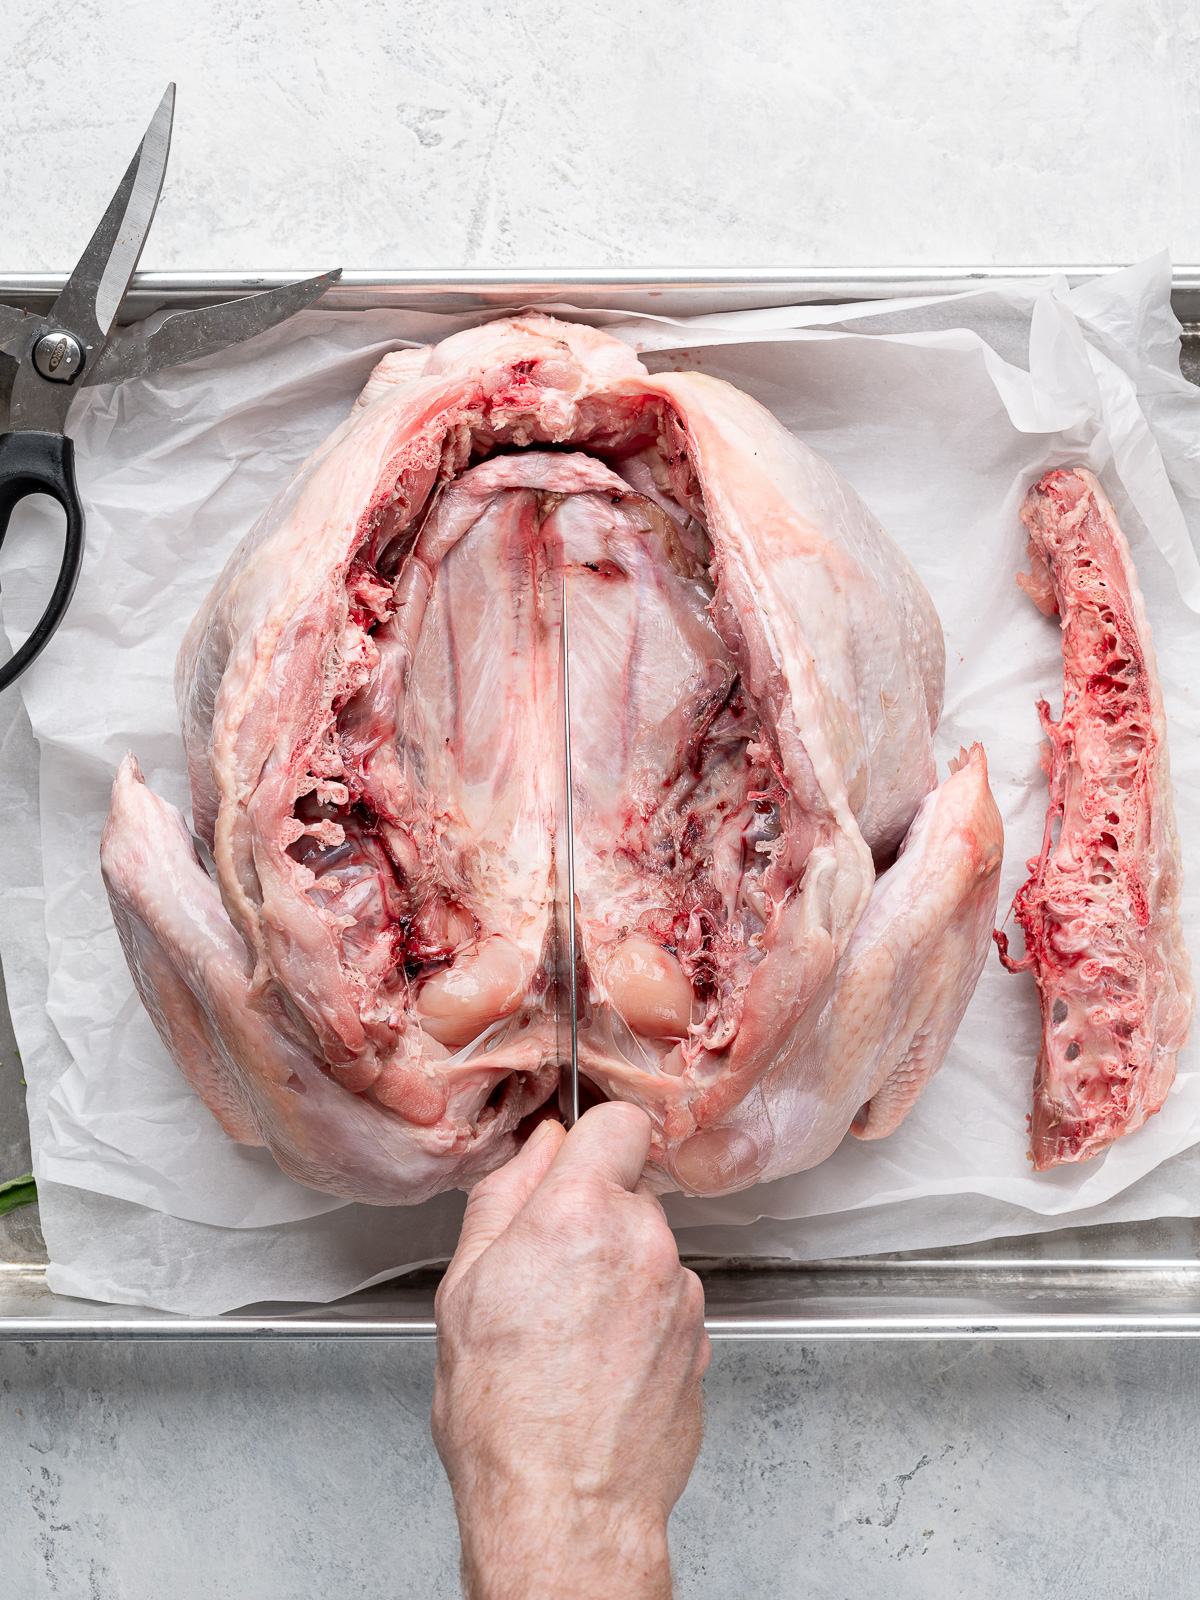
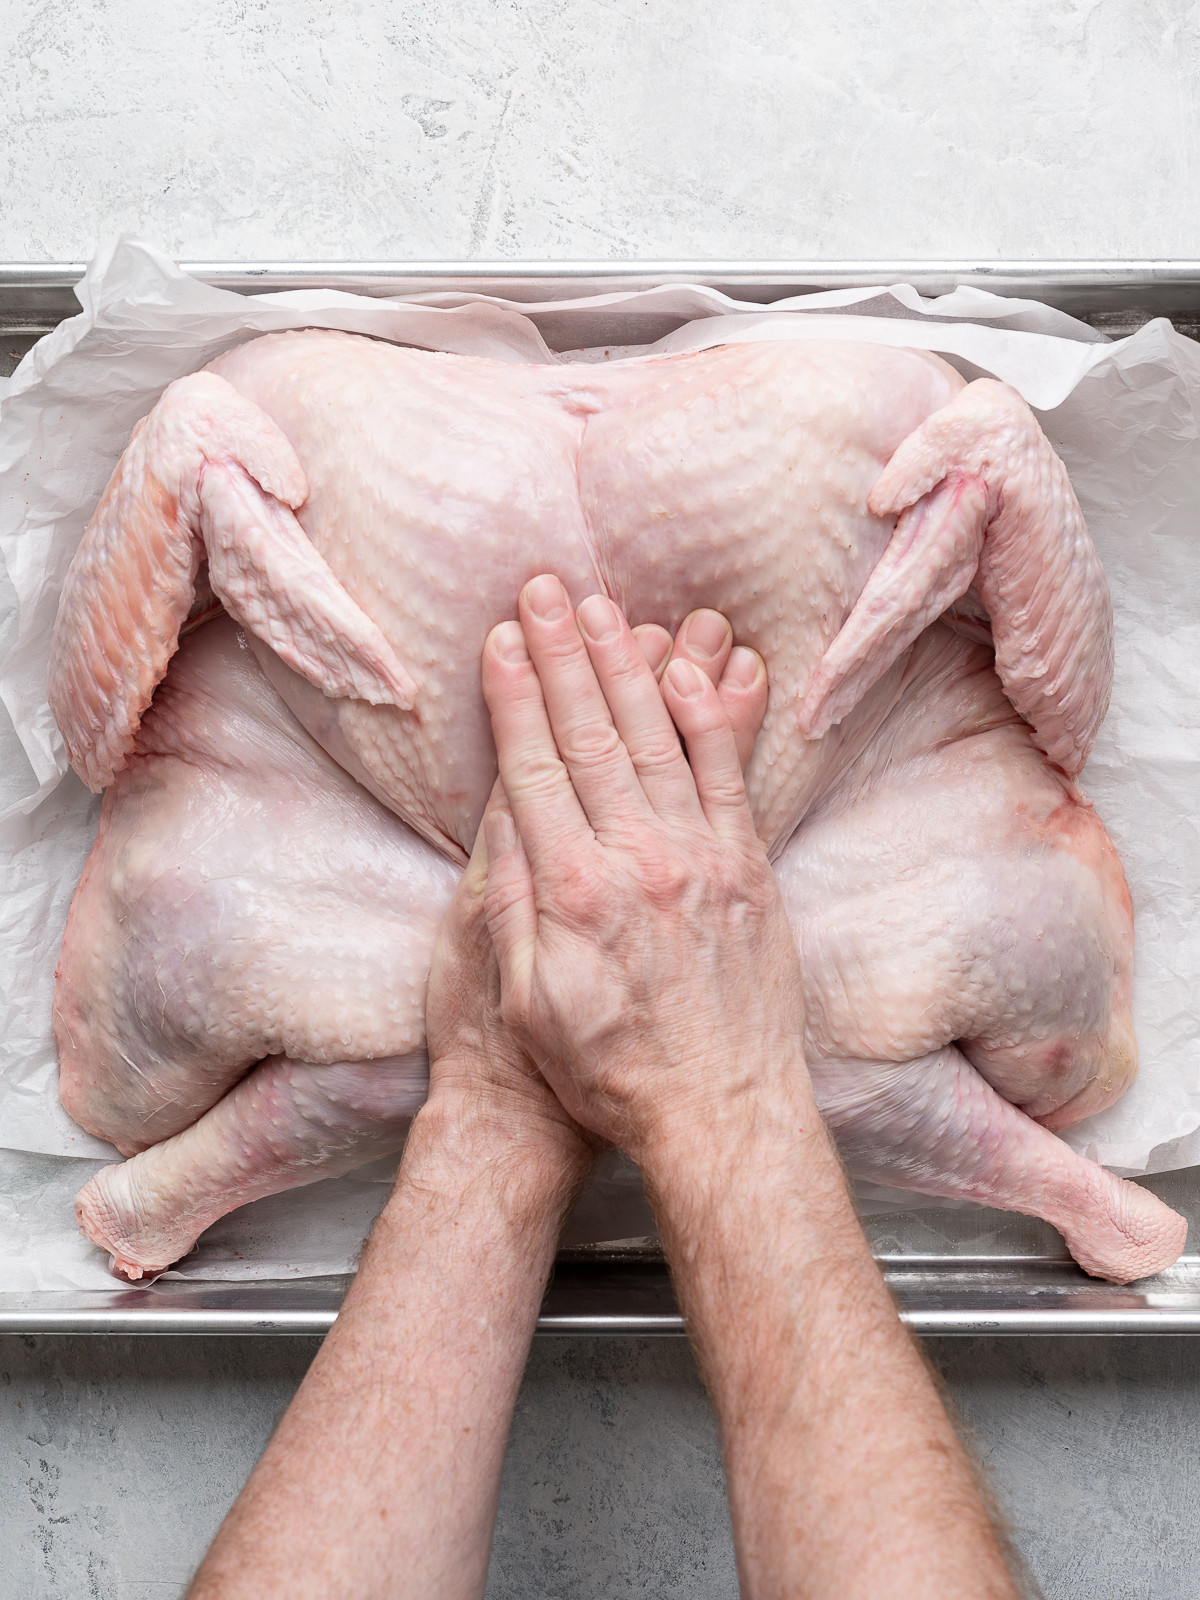
Cut a small incision on the cartilage that is between the two breast bone.
Now flip the turkey breast-side up and press hard on the breast to break the rib cage bone to flatten the breast even further.
The turkey is now ready for dry brining. Save the turkey back and giblets to make gravy, if you wish. You can make the gravy a day or two ahead from roasting the turkey.
What Size Turkey Is Best For Spatchcocking?
Any size turkey will work for spatchcocking, but the smaller the bird, the easier it is to handle. A 12-14 lb turkey is ideal since anything larger will be hard to fit on a half sheet pan that measures 17 1/4″ × 12 1/4″ × 1″.
This past (Canadian) Thanksgiving I cooked a 19-pound spatchcocked turkey but I used an X-large sheet pan, which typically measures 20 1/4″ × 14 1/4″ × 1″. It turned out fabulous!
How To Dry Brine A Turkey
These instructions for dry brining a turkey will work on a spatchcocked, or non-spatchcocked turkey.
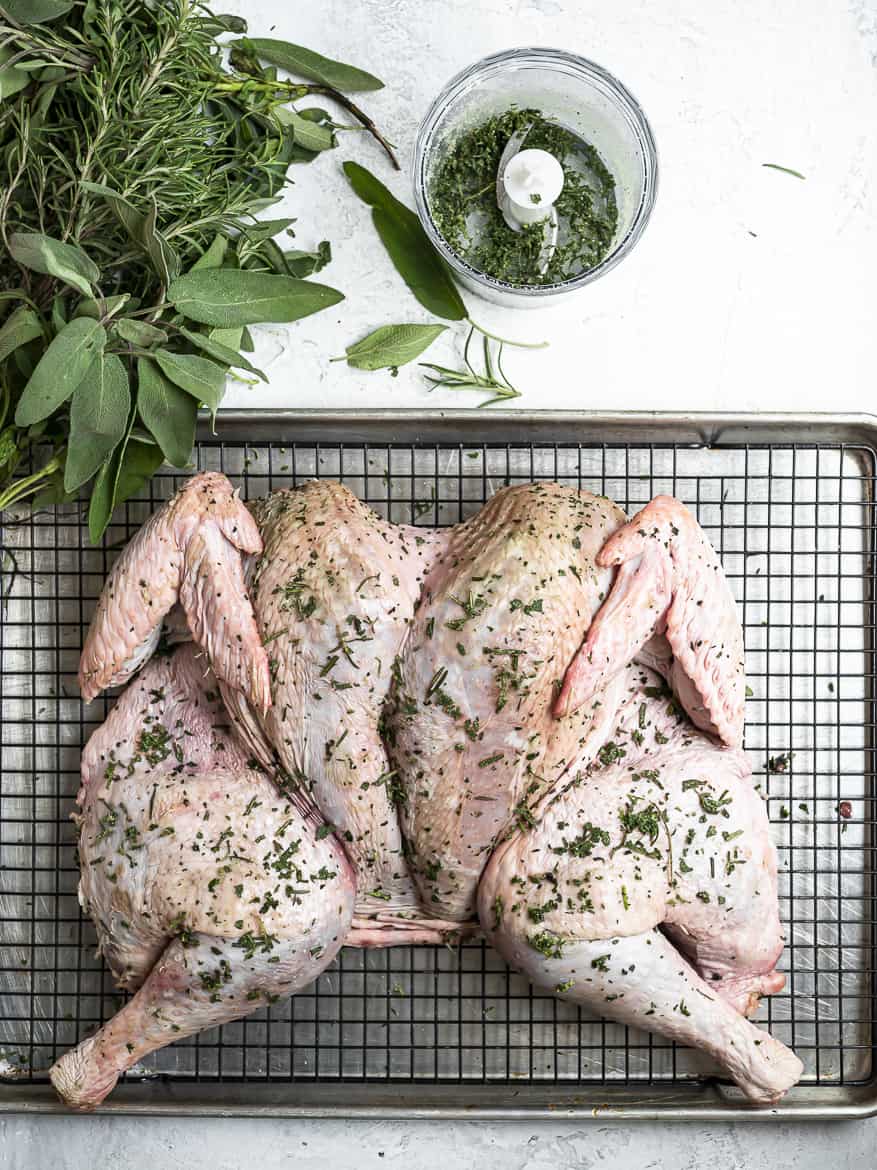
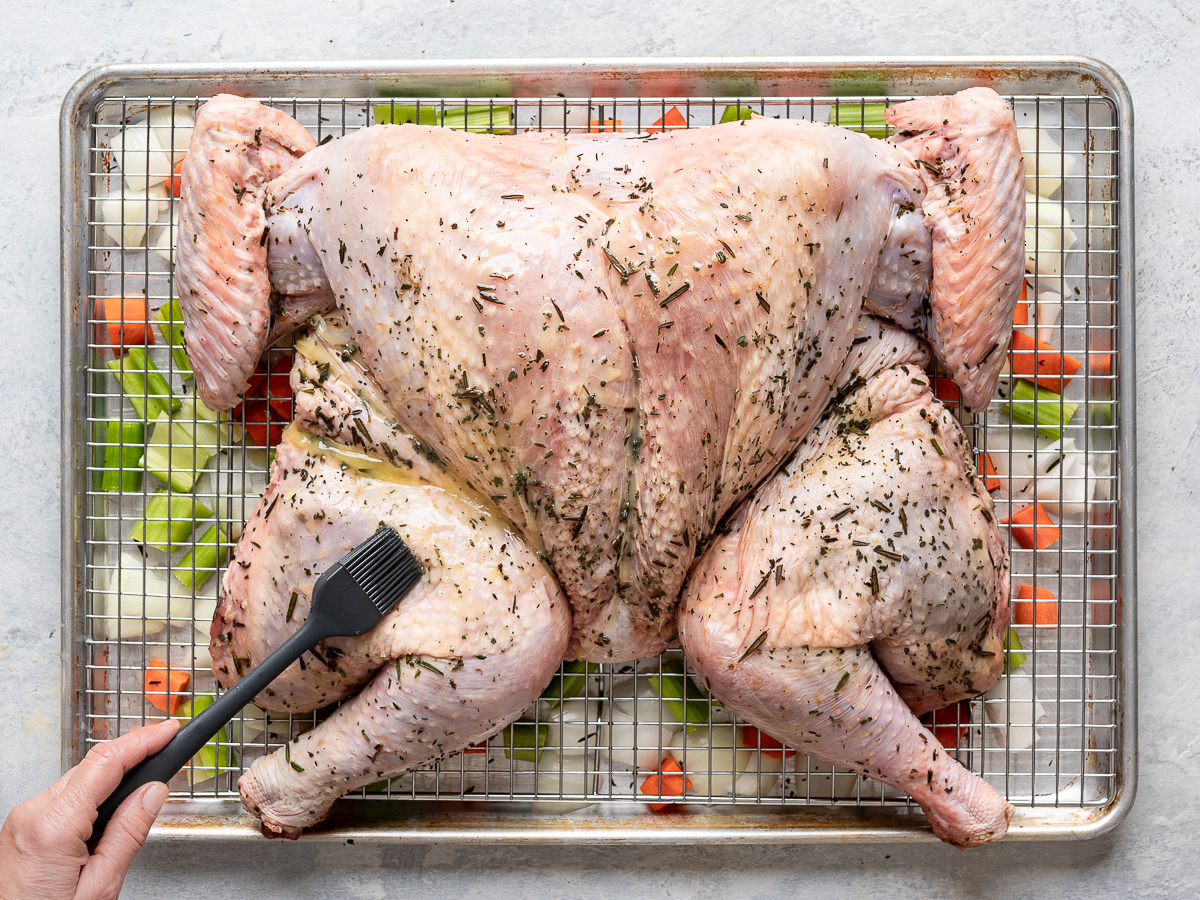
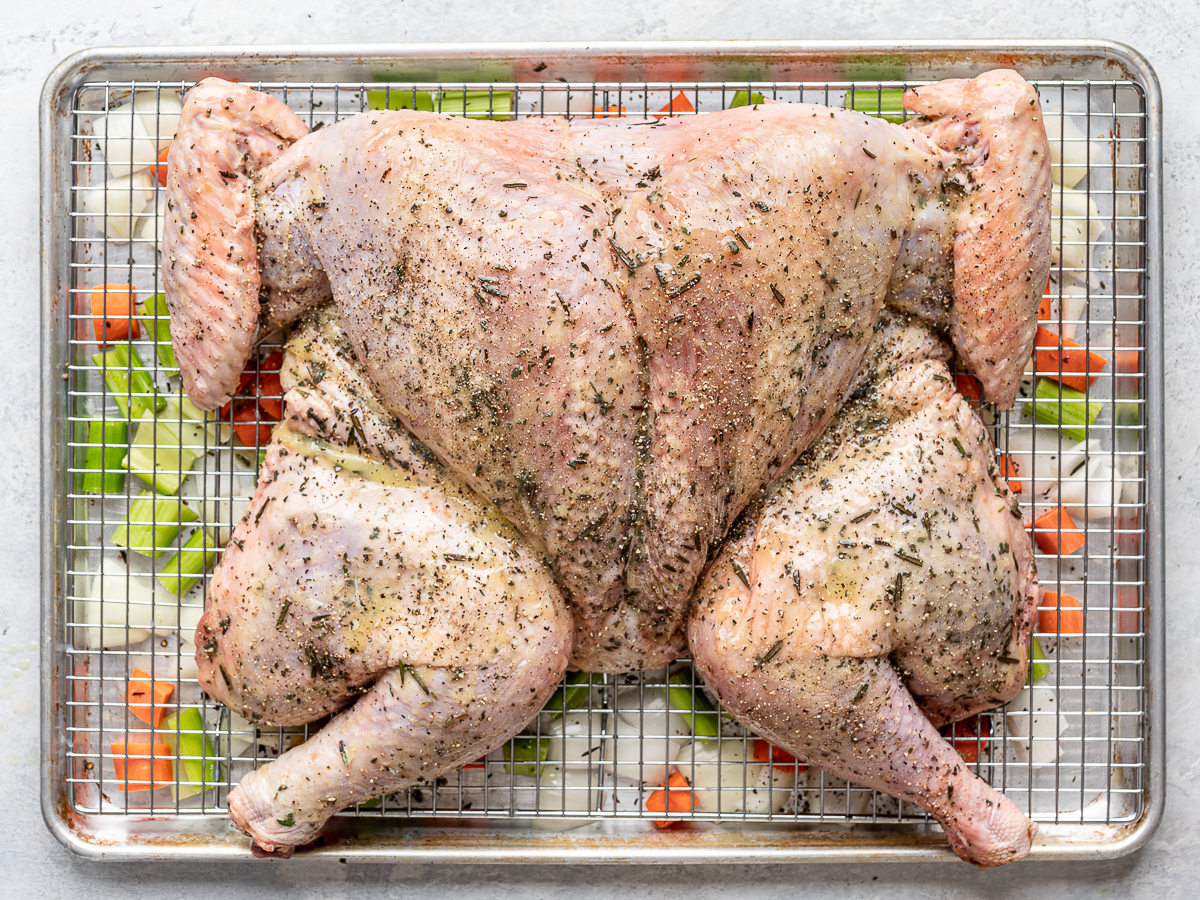
- Set an oven-safe wire rack on top of a large baking sheet and place the turkey on top, breast side up. Pat the bird dry inside and out. Use approximately 1 tablespoon of kosher salt per 5 pounds of turkey. Mix the salt with chopped fresh herbs, if using. Rub the salt mixture all over the skin, and the inside areas of the turkey as well.
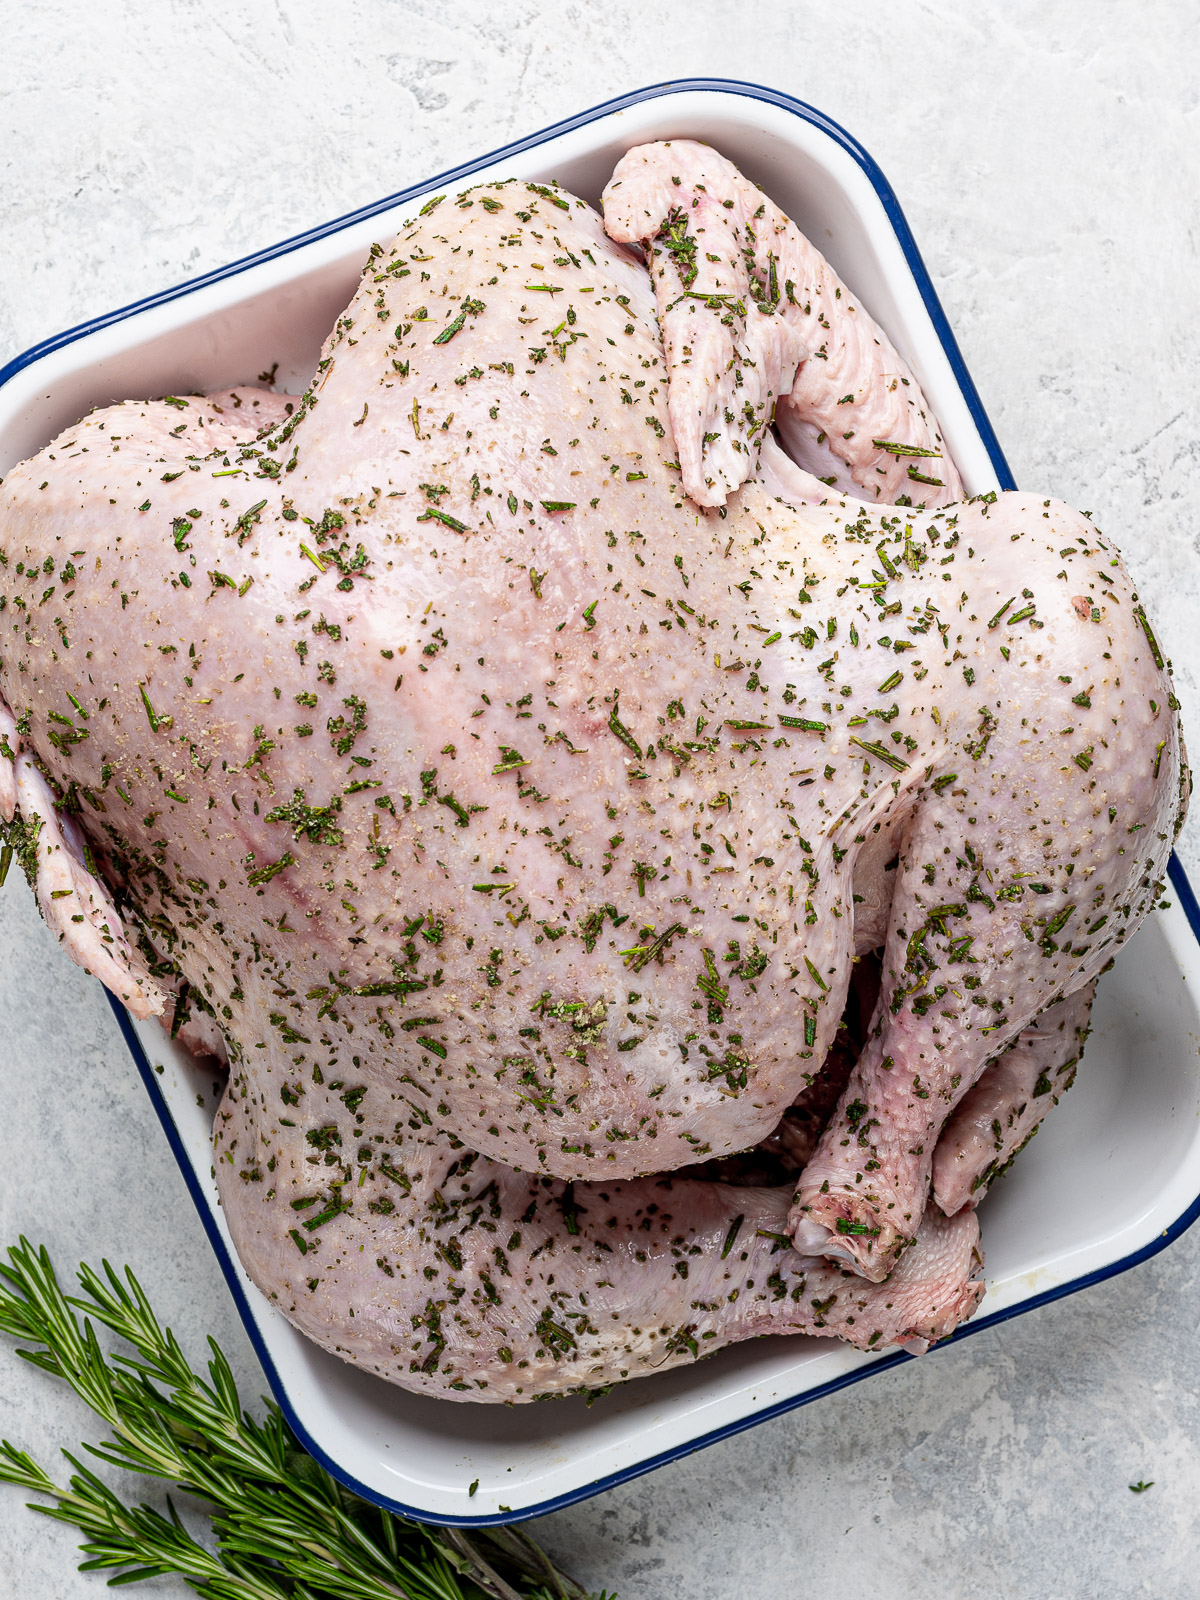
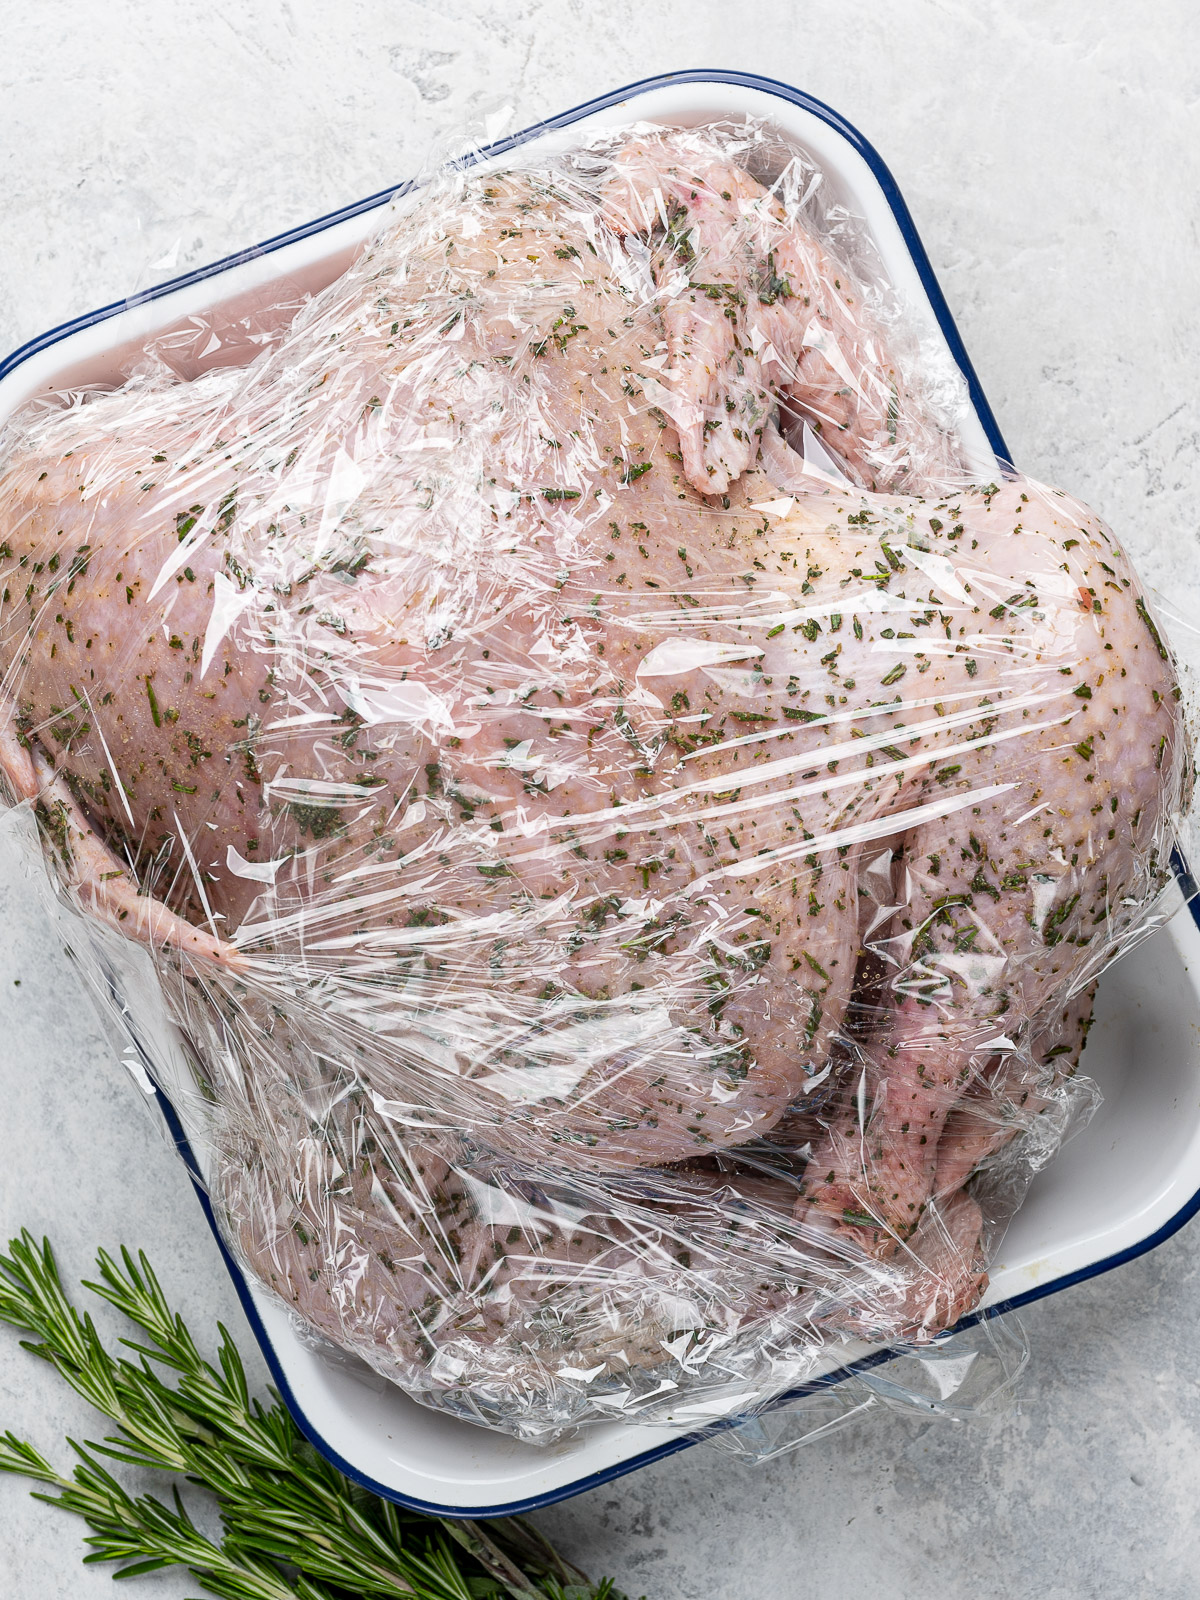
- Cover with plastic wrap and refrigerate 24-72 hours. If you don’t have room in your fridge for a large baking sheet, transfer it to a large bowl or large baking pan (as shown below). For really crispy skin, remove the plastic wrap 1 day before you plan on roasting the turkey. If you are dry brining for only 24 hours or less, leave uncovered the whole time.
NOTE: The turkey does not need to be rinsed before roasting. Rinsing the bird will wash off all the flavor and rehydrate the skin which defeats the purpose of dry brining. The turkey will not be too salty but if making gravy, hold off on adding any salt just to be safe.
Best Salt For Dry Brining
Kosher salt is best for dry brining any meat. Table salt is a lot saltier and the small crystals will not work for dry brining.
Though any kosher salt will work for brining, it is important to not that the size and structure of the crystals will vary by brand. This variation will make some brands taste slatier than others so you need to adjust the amount used.
My preferred brand of Kosher salt is Diamond Crystal which has the perfect-sized grains and will not make the turkey too salty. If you use a different brand of Kosher salt such as Windsor, or Morton, which have larger salt granules, you will need to reduce the amount of salt given in this recipe by about 1-2 teaspoons.
How To Roast A Spatchcocked Turkey
Once your turkey is spatchcocked and brined, the rest of the process is quick and fuss-free.
1-2 HOURS BEFORE ROASTING:
Remove turkey from the fridge and bring to room temperature. This step is important. A fridge-cold turkey will take longer to roast and will seize up in a hot oven. It takes at least 1 hour for a fridge-cold turkey to reach room temperature so be sure to plan ahead. Do not rinse the turkey!
ROAST THE TURKEY:
Preheat oven. A half hour before the turkey is ready to roast, adjust an oven rack to middle position and preheat the oven to 450ºF (230ºC).
Prepare sheet pan. If using, scatter onions, carrots, and celery across bottom of pan. Place wire rack directly on top of vegetables.
Place the room temperature turkey on the rack. The turkey should be spread out, skin side up. Arrange the turkey so it fits inside the pan as much as possible. Tuck the wing tips under and turn the legs out. If the legs are hanging over the edge of the pan, consider placing a piece of aluminum underneath the pan to catch any drippings.
Melt 6 tablespoons butter. Brush all the skin with melted butter (or you could use olive oil) then sprinkle with freshly cracked pepper to taste.
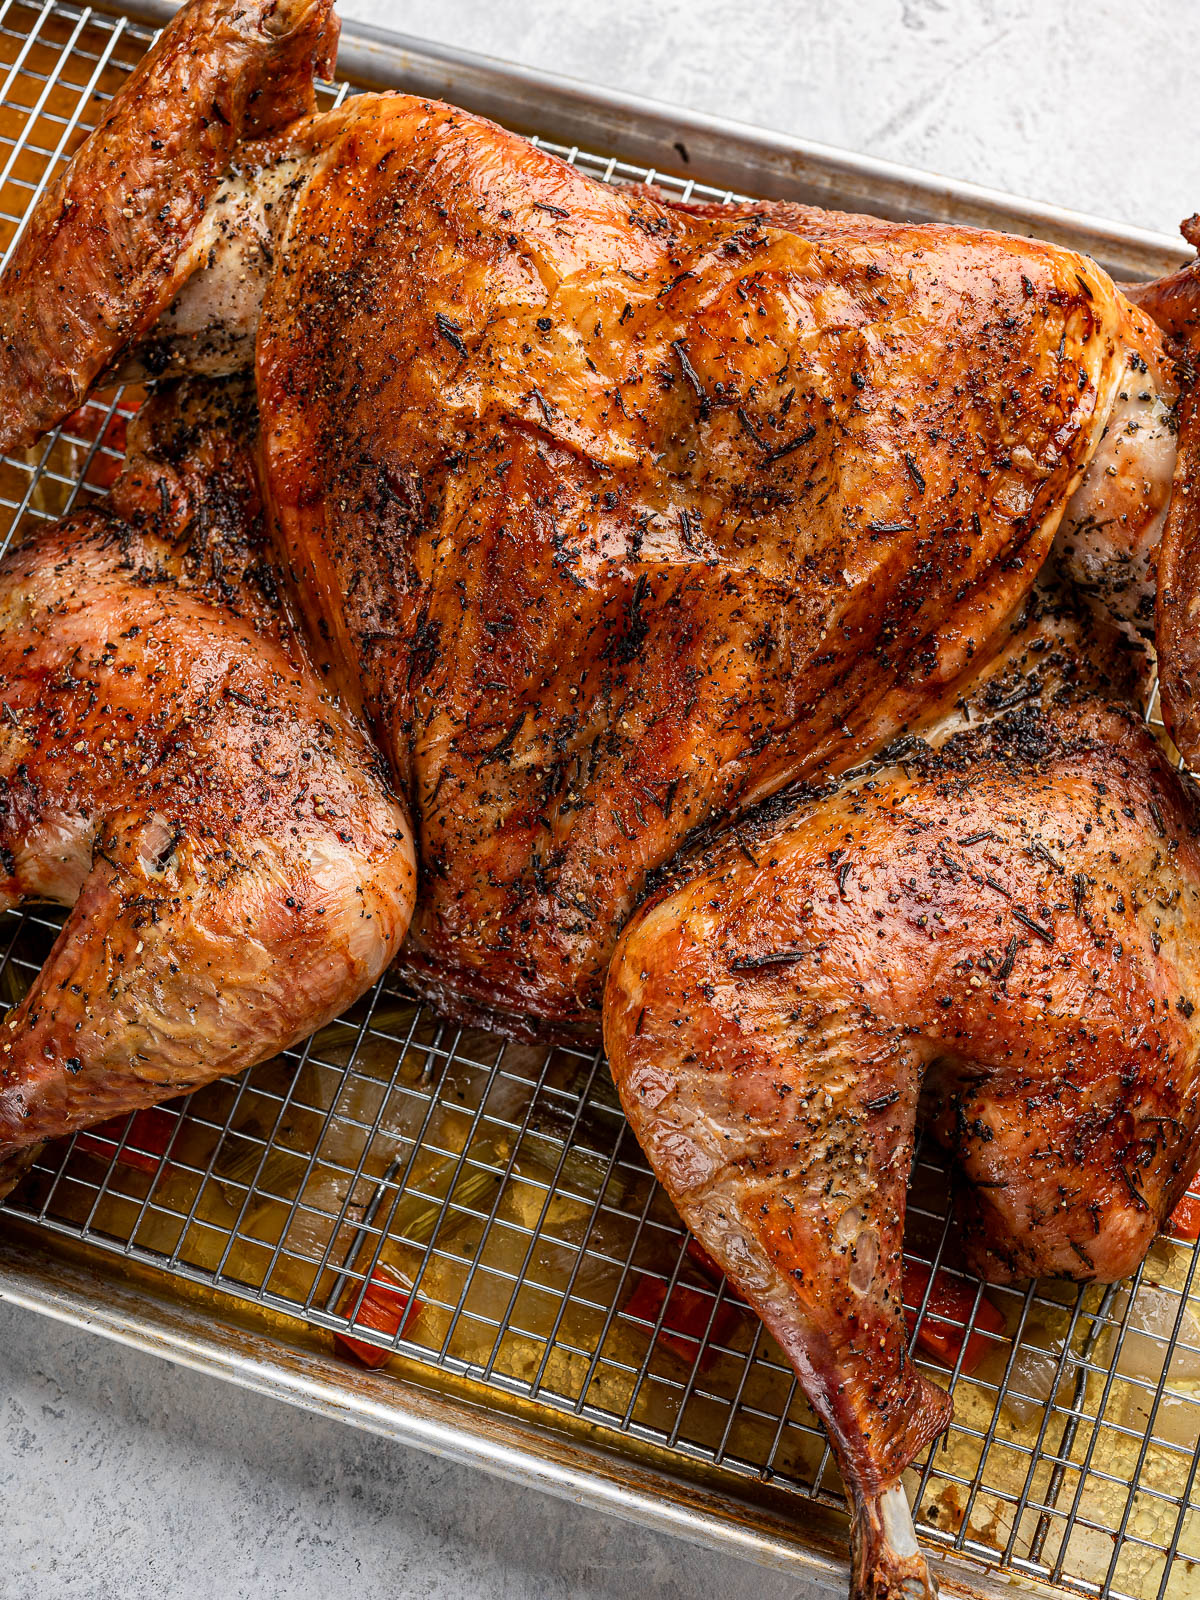
Roast. Place the turkey in the oven and pour 2 cups of water, broth, white wine or a mix of any three liquids, in the pan. Roast at 450°F for 30 minutes, then lower the temperature to 400°F and rotate the pan. Add a bit more liquid, if necessary. Roast until the internal temperature of the thickest past of the thigh reaches 165ºF – 170ºF and the breast 155ºF – 160ºF degrees. A 14-pound turkey will take about 90-95 minutes. A 12-pound turkey may only need 80-85 minutes. A spatchcocked turkey is best cooked at a high temperature. If your oven runs really hot, you can lower the temperature to 375 degrees after 30 minutes.

Rest the turkey. Remove the turkey from the oven and transfer it to a cutting board and tent with foil. Allow it to rest for 30 minutes (you can go a little longer, if necessary) before carving. This step is crucial for a juicy, perfectly cooked turkey. Strain the pan drippings to make gravy, if desired.
Carve and serve!
Is Dry Brine Better Than Wet Brine?
It is hard to infuse enough flavour into turkey meat without brining it and I much prefer a dry brine over a wet brine. In fact, I did a wet brine only once and will never do it again. I won’t get into details but I have no desire to have a massive bucket filled with water and a turkey in my fridge ever again. What a nightmare.
Essentially, a dry brine is simply rubbing the turkey down with a lot of salt and a few optional herbs, then letting it rest in the refrigerator for 24-72 hours. The salt changes the protein structure in the meat, causing it to release moisture then reabsorb it again resulting in perfectly juicy, tender, and flavourful meat.
Furthermore, placing the turkey with a dry brine in the fridge to air dry uncovered for at least 6-24 hours, will give you a bird with the crispiest, most golden-coloured skin.
A dry brine is a much easier, no-hassle method to add flavour to the turkey and it’s a sure way to ensure it stays crispy on the outside and juicy on the inside.
Tips for the best roast turkey
- Read over the recipe once or twice. Though the steps to roasting a spatchcocked turkey are simple, there is a lot of information and tips. Read over the recipe instructions and notes a few times to become a bit familiar with the whole method.
- Season simply. Because the spatchcocked turkey will roast at a high temperature, you want to keep the seasoning simple. Minced garlic, dijon marinades, etc, will burn too quickly. I added fresh herbs to the dry brine but even that is not necessary. Butter, salt, and pepper add plenty of flavor and gorgeous color to the turkey.
- Use a meat thermometer. You cannot guess the temperature on this one. Use a reliable meat thermometer to ensure you don’t over cook or under cook the turkey. An instant read thermometer such as this one, works great. When inserting the thermometer into the meat, make sure it is not touching the bone to get an accurate reading.
- Add more water to roasting pan. To prevent pan drippings from burning, feel free to add more water or chicken broth to the pan.
- Sharpen your knife for carving. If you have the time to get your knives professionally sharpened, this would be a great time to do it. It makes the job of carving the turkey a breeze.
Recipe FAQ’s
100% yes. The salt changes the protein structure in the meat, causing it to release moisture then reabsorb it again resulting in perfectly juicy, tender, and flavourful meat.
Ideally, you want a small turkey for spatchcocking (12-16 pounds). This is so it will fit on a sheet pan and cook quickly. That said, I recently cooked a 20-pounder on an X-large sheet pan and it turned out perfectly.
If you dry brine the turkey 3 days ahead, I recommend covering it with plastic wrap for the first 48 hours. Then, remove the plastic wrap and let it sit uncovered in the fridge for 12-24 hours so the skin dries out. If you only have time to do an overnight brine, then leave it uncovered.
Not at all. Just trust the process. Rinsing the bird will wash off all the flavor and rehydrate the skin which defeats the purpose of dry brining. Your bird will be perfectly seasoned and delicious, I promise. That said, the drippings might be a little salty so if you using them for gravy, do not add extra salt.
If you’ve dry-brined your turkey, there’s no need to baste it during cooking. The brining process locks in moisture, ensuring a juicy turkey without the extra step. In fact, basting might actually soften the skin, taking away that nice crispiness.
How to Store Leftover Turkey
- Store leftover turkey in the fridge in an airtight container for 3-4 days, or freeze for up to months.
Perfect Holiday Sides To Serve With Turkey
- Roasted Delicata Squash and Quinoa Salad
- Sweet Potato Gratin with Sage
- Crispy Brussel Sprouts with Agrodolce Sauce
- Sheet Pan Root Vegetable Gratin
- Farro Arugula Salad
Did you try this recipe?
Let us know your thoughts on this Spatchcock Turkey with Dry Brine by leaving a star rating below!
Thank you!~Sandra
Spatchcock Turkey with Dry Brine
Ingredients
- 1 (12 to 14) pound fresh turkey natural whole turkey
For the dry brine
- 4 tablespoons Kosher salt (or 1 1/2 tablespoon per 5 pounds) I use Diamond Crystal (see notes)
- 1/3 cup of mixed fresh herb leaves and tender stems, such as thyme, rosemary, and sage
To Roast the Turkey
- 2 cups chopped vegetables such as onion, carrots, celery, or fennel (optional)
- 6 Tablespoons melted unsalted butter or unrefined olive oil
- freshly cracked black pepper to taste
- 2 cups water, no-salt chicken stock, or wine, or a mix of all three, plus more if needed
Instructions
Spatchcock The Turkey
- Remove the neck and giblets from inside the turkey. On a large cutting board or baking sheet, place the turkey breast-side down so the backbone is facing up. Using a pair of poultry shears or sharp kitchen shears, cut down each side of the backbone, cutting all the way through to remove the backbone completely. Save the backbone and giblets to make stock, if you wish (you can make the gravy a day or two ahead from roasting the turkey).
- Cut a small incision on the cartilage that is between the two breast bone. Now flip the turkey breast-side up and press hard on the breast to break the rib cage bone to flatten the breast even further.
- TIP: If you can order a spatchcocked turkey from a butcher, do it! Be sure to ask for the backbone that was removed to use it to make stock.
Dry Brine The Turkey
- Combine salt and fresh herbs in a food processor or mini chopper; process until herbs are finely chopped.
- Place the flattened turkey, breast side-up, on a large sheet pan to apply dry brine. Pat dry the turkey inside and out with paper towels. Sprinkle the salt mixture evenly all over the outside and the underside of the turkey. Loosely cover with plastic wrap and place in the fridge for 1-3 days. 12-24 hours before you plan on roasting the bird, remove the plastic wrap and leave uncovered in the fridge.
- TIP: If you can't fit a large baking sheet in the fridge, place the turkey in a large bowl.
Prepare Sheet Pan
- If using, scatter onions, carrots, and celery across the bottom of a large sheet pan. Place wire rack directly on top of vegetables.
- TIP: A spatchcocked turkey will roast best on a shallow baking sheet fitted with a wire rack. If you don't have one, use the shallowest baking pan you have and fill it with large chunks of vegetables such as carrots, onions and celery. Place the turkey on top of the vegetables.
Prepare The Turkey And Oven For Roasting
- Take turkey out of the fridge 60-90 minutes before you plan to roast it.
- A half hour before the turkey is ready to roast, adjust an oven rack to middle position and preheat the oven to 450ºF (230ºC). A large oven will take about 25-30 minutes to preheat.
- Once the turkey has come to room temperature, and the oven is preheated, place the turkey on prepared sheet pan, breast-side up. Arrange the turkey so it fits inside the pan as much as possible, then tuck the wing tips under and turn the legs out. Brush the turkey all over with the melted butter. Sprinkle with freshly cracked black pepper to taste.
- TIP: If the legs are hanging over the edge of the pan, consider placing a piece of aluminum underneath the pan to catch any drippings.
Roast The Turkey
- Place the turkey in the oven and pour 2 cups of liquid (water, broth, wine or a mix) in the pan. Roast at 450° F for 30 minutes. Carefully rotate the pan, and add a bit more water if necesary, then lower the temperature to 400°.
- Continuing roasting until the internal temperature of the thickest part of the thigh reaches 165ºF and the breast 155ºF degrees. A 14-pound turkey will take about 90-95 minutes total. A 12-pound turkey may only need 80-85 minutes so start checking early. If the turkey is browning too qucikly, just cover loosely with foil. Add more water or broth if the pan drippings are burning.
- TIP: Add more water or broth if the pan drippings are burning.
Rest the Turkey
- Remove the turkey from the oven, transfer it to a cutting board, and tent with foil. Allow it to rest for at least 30 minutes before carving (45 minutes is even better). Do not rush the resting period, this step is crucial for a juicy, perfectly cooked turkey.
- TIP: Strain the pan drippings into a heat-safe container, lightly pressing on the veggies to extract as much as possible. Set aside to make gravy (recipe in notes).
Notes
-
- Read over the recipe once or twice. Though the steps to roasting a spatchcocked turkey are simple, there is a lot of information and tips. Read over the recipe instructions and notes a few times to become a bit familiar with the whole method. The step-by-step photos provided in the post are also very helpful.
-
- Season simply. Because the spatchcocked turkey will roast at a high temperature, you want to keep the seasoning simple. Minced garlic, dijon marinades, etc, will burn too quickly. I added fresh herbs to the dry brine but even that is not necessary. Butter, salt, and pepper add plenty of flavor and gorgeous color to the turkey.
-
- Use a meat thermometer. You cannot guess the temperature on this one. Use a reliable meat thermometer to ensure you don’t over cook or under cook the turkey. An instant read thermometer such as this one, works great. When inserting the thermometer into the meat, make sure it is not touching the bone to get an accurate reading.
-
- Add more water to roasting pan. To prevent pan drippings from burning, feel free to add more water or chicken broth to the pan.
-
- Sharpen your knife for carving. If you have the time to get your knives professionally sharpened, this would be a great time to do it. It makes the job of carving the turkey a breeze.
- Depending on how hot your oven runs, and how big or small your turkey is, you may need more or less roasting time. Start checking the temperature after 75 minutes to gauge how much longer the turkey needs to roast.
- A spatchcocked turkey is best cooked at a high temperature. If your oven is really hot (mine isn’t) you can lower the temperature to 375 degrees after 30 minutes.
- If roasting two turkeys at once, set the oven to convection cooking, if possible. But be sure to reduce all temperatures by 25 degrees for convection.
- 3 tablespoons butter
- 2 1/2 tablespoons flour
- 3 cups homemade turkey stock, or store-bought chicken broth
- Turkey drippings
- Freshly ground black pepper
- Kosher salt (the turkey drippings will be salty so add only if needed)
- In a medium saucepan, melt the butter over medium heat. Whisk in the flour and cook, stirring constantly, until lightly golden, about 2 minutes.
- Slowly whisk in turkey stock or broth and all the reserved turkey drippings. Continue to whisk until smooth. Simmer, whisking occasionally about 5-10 minutes, or until desired thickness is achieved.
- Season to taste with pepper and add a little salt only if needed. Gravy can be stored in the fridge, tightly covered, for up to 4 days. Reheat over low heat until warm, whisking occasionally.
This recipe was originally posted October 6, 2020. It has since been updated with additional information, process photos, and tips. Shout out to Brady’s Meat & Deli for finding a gorgeous, out-of-season turkey for me for this photo shoot!

Michelle
Sandra thank you for the amazing recipe. We tried your spatchcock technique this past weekend and the results were fantastic. We may never go back to the traditional way of cooking a turkey! Many thanks.
Sandra Valvassori
Yay!! So wonderful to hear this Michelle! Thank you so much for sharing with us – it truly is a life-changing method :))
Rick Dunning
Love the spatchcocked turkey technique, any suggestions for grilling instead of oven roasting ??
Sandra Valvassori
You could absolutely grill a spatchcocked turkey but I have never tried it myself so I am not able to provide detailed instructions. You could, however, follow the instructions in my recipe for Grilled Piri Piri Chicken allowing more time depending on the size of your turkey. Cutting the turkey in half all the way through the breast (as I do with the piri chicken) would make it a lot easier to flip the turkey. Good luck and let me know if you give it a try!
Christina
This turned out SO well. So much better than a whole roasted turkey for Thanksgiving. It roasted much more evenly, and quicker. This is my go-to now, thank you!
Sandra Valvassori
Woohoo! So happy to hear that, Christina! Thank you so much for making this recipe, and for your kind review.
Eddie
Work well I have butterfly cooked turkeys before and love the results Never dry brined one but this turned out great. Thank you for posting this recipe.
Sandra Valvassori
So happy to hear you enjoyed the turkey, Eddie! Thank you for taking the time to leave a review!